Useful Date Functions
Define Academic Year of Date - Calculated Column
It's handy to be able to classify dates by academic year. On a small table, like Exclusions, I'll do this as a calculated column. Let's say I have a field called ExclusionDate with the data type date (duh!) and I want to produce an academic year in the format "2018/19".
We'll make a calculated column using the following formulas:
IF - (<logical test> , <value if true>, <value if false)
MONTH (<date>) - returns numerical value 1 to 12 for Jan to December of the month of the selected date
YEAR (<date>) returns the numerical value of the year of the selected date
Basically, our formula is going to test if the date is in Sept - Dec or Jan - Aug , then perform two calculations to get the numbers either side of the "/"
=IF(MONTH(Exclusions[ExclusionDate])>8,YEAR(Exclusions[ExclusionDate])&"/"&YEAR(Exclusions[ExclusionDate])-1999,YEAR(Exclusions[ExclusionDate])-1&"/"&YEAR(Exclusions[ExclusionDate])-2000)
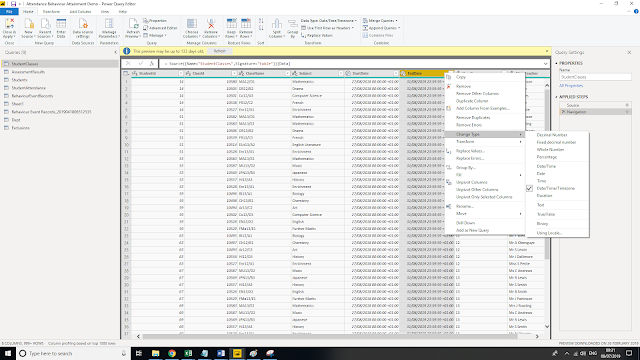
Help! My date's not a date
If that formula doesn't work a possible reason is that BI doesn't know that a date field is a date and is storing the information as a string. Date fields have a little calendar next to them in the field list.

If that's missing you can select the field on the right hand side, go to the modelling tab and change its type there.

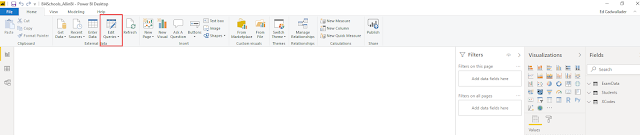
Or click on Edit Queries on the home ribbon, right click the field and change its type there. I recommend this second approach as it corrects the data as it's brought into BI and will alert you if anything funny is going on at this stage.
Academic Year on Big Tables
As a general rule you should avoid calculated columns, especially on big tables. The reason is that BI is continually performing the calculation for every row of the table and that takes up memory and processing power. This is especially true of the academic year of attendance dates - there are hundreds of attendance records for every day so it's wasteful to calculate the academic year of each of them individually.
Instead, what you want to do is create a table that has every date in the range you're interested in only once. To do this use there's a special DAX formula called CALENDAR, which creates a table with a single field containing every date between a defined start and end date.
Create a new table (New Table on the Modelling tab)
DateTable = CALENDAR("01/01/2016","31/12/2019") - this would create a table with every date in 2016 to 2019.
You can fancy it up by making it:
DateTable = CALENDAR("01/01/2016",TODAY())
That will mean the maximum date is always today's date so slicers based off it will run up to today.
Once you've created this table you can add the calculated column from above to put the academic year (which will now be calculated only once per date). Then create a relationship between DateTable[Date] and your attendance date so that you can filter attendance by academic year.
Note that this relationship will only work if your attendance dates are stored as dates, not datetimes. If that's the case I recommend changing the data type via Edit Queries as above, although note that this will mean that the time of the attendance record is no longer available.
Slicer with this or Multiple Academic Years
Say you want to be able to select and academic year then have a slicer to choose date ranges within that year, but also the option to choose that range across multiple years. By default, date slicers don't affect other date slicers, so to make this work you need to put both your slicers on the page, select the AcademicYear slicer then go to 'Edit Interactions' on the Format tab. Then click the filter button of the date slicer.

Week Start Date from Year and Week Number
If you use the Bromcom MAT Vision database then attendance records have a year and week number but no date. You can work out the date but it does require a calculated column on a big table so there might be a performance trade off. If you need it though, this is the formula, which uses the following formulas:
DATE - this creates a date by separately inputting the Year, Month and Day
WEEKDAY this gives you the number of the weekday (1-7) of the chosen date. It can work with various starts - here I use option 2 which is Monday = 1.
StartDate = (DATE('Student Attendance'[Year],1,1)-WEEKDAY(DATE('Student Attendance'[Year],1,1),2)+1)+('Student Attendance'[Week]-1)*7
It works by taking the first of January of the year, then subtracting whatever weekday number that was then adding 1 to get the start of that week. So in 2019 Jan 1st was a Tuesday (weekday = 2) So it subtracts 2 days from the date then adds one back which gives us Monday's date, 31/12/2018. That's week 1 so it adds 7 (because 7 days in a week) * (1-1) ie 0. The following week it would add 7*1 to give us the Monday of that week and so on.
It's handy to be able to classify dates by academic year. On a small table, like Exclusions, I'll do this as a calculated column. Let's say I have a field called ExclusionDate with the data type date (duh!) and I want to produce an academic year in the format "2018/19".
We'll make a calculated column using the following formulas:
IF - (<logical test> , <value if true>, <value if false)
MONTH (<date>) - returns numerical value 1 to 12 for Jan to December of the month of the selected date
YEAR (<date>) returns the numerical value of the year of the selected date
Basically, our formula is going to test if the date is in Sept - Dec or Jan - Aug , then perform two calculations to get the numbers either side of the "/"
=IF(MONTH(Exclusions[ExclusionDate])>8,YEAR(Exclusions[ExclusionDate])&"/"&YEAR(Exclusions[ExclusionDate])-1999,YEAR(Exclusions[ExclusionDate])-1&"/"&YEAR(Exclusions[ExclusionDate])-2000)
Help! My date's not a date
If that formula doesn't work a possible reason is that BI doesn't know that a date field is a date and is storing the information as a string. Date fields have a little calendar next to them in the field list.
If that's missing you can select the field on the right hand side, go to the modelling tab and change its type there.

Or click on Edit Queries on the home ribbon, right click the field and change its type there. I recommend this second approach as it corrects the data as it's brought into BI and will alert you if anything funny is going on at this stage.

Academic Year on Big Tables
As a general rule you should avoid calculated columns, especially on big tables. The reason is that BI is continually performing the calculation for every row of the table and that takes up memory and processing power. This is especially true of the academic year of attendance dates - there are hundreds of attendance records for every day so it's wasteful to calculate the academic year of each of them individually.
Instead, what you want to do is create a table that has every date in the range you're interested in only once. To do this use there's a special DAX formula called CALENDAR, which creates a table with a single field containing every date between a defined start and end date.
Create a new table (New Table on the Modelling tab)
DateTable = CALENDAR("01/01/2016","31/12/2019") - this would create a table with every date in 2016 to 2019.
You can fancy it up by making it:
DateTable = CALENDAR("01/01/2016",TODAY())
That will mean the maximum date is always today's date so slicers based off it will run up to today.
Once you've created this table you can add the calculated column from above to put the academic year (which will now be calculated only once per date). Then create a relationship between DateTable[Date] and your attendance date so that you can filter attendance by academic year.
Note that this relationship will only work if your attendance dates are stored as dates, not datetimes. If that's the case I recommend changing the data type via Edit Queries as above, although note that this will mean that the time of the attendance record is no longer available.
Slicer with this or Multiple Academic Years
Say you want to be able to select and academic year then have a slicer to choose date ranges within that year, but also the option to choose that range across multiple years. By default, date slicers don't affect other date slicers, so to make this work you need to put both your slicers on the page, select the AcademicYear slicer then go to 'Edit Interactions' on the Format tab. Then click the filter button of the date slicer.

Week Start Date from Year and Week Number
If you use the Bromcom MAT Vision database then attendance records have a year and week number but no date. You can work out the date but it does require a calculated column on a big table so there might be a performance trade off. If you need it though, this is the formula, which uses the following formulas:
DATE - this creates a date by separately inputting the Year, Month and Day
WEEKDAY this gives you the number of the weekday (1-7) of the chosen date. It can work with various starts - here I use option 2 which is Monday = 1.
StartDate = (DATE('Student Attendance'[Year],1,1)-WEEKDAY(DATE('Student Attendance'[Year],1,1),2)+1)+('Student Attendance'[Week]-1)*7
It works by taking the first of January of the year, then subtracting whatever weekday number that was then adding 1 to get the start of that week. So in 2019 Jan 1st was a Tuesday (weekday = 2) So it subtracts 2 days from the date then adds one back which gives us Monday's date, 31/12/2018. That's week 1 so it adds 7 (because 7 days in a week) * (1-1) ie 0. The following week it would add 7*1 to give us the Monday of that week and so on.

Comments
Post a Comment